Uno - Arduino UNO with serial communication
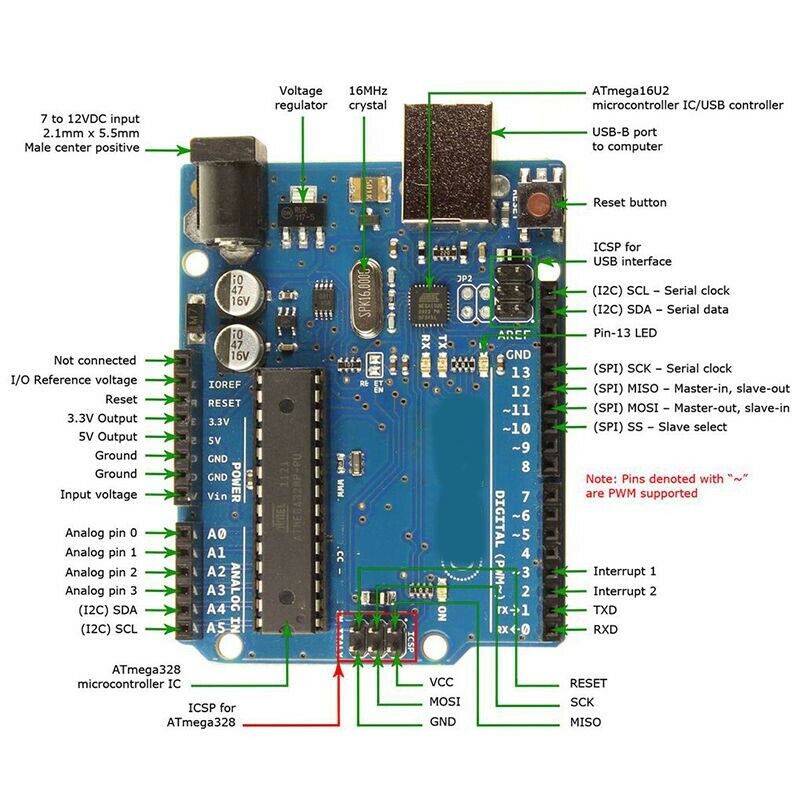
Uno is used to test and demonstrate running IOCOM in very minimal hardware. Arduino UNO comes with 2kB of RAM and limited flash memory.
The IOCOM is build with OSAL_MINIMALISTIC flag for UNO hardware, which leaves only bare bones serial communication. This build should detect UNO automatically and turn this flag on.
This example uses iocom/eosal entry point and loop functions, so that same code builds on linux. Normal Arduino ones could be used as well. This may be more readable option, since common Arduino framework is more clearly visible and calls to iocom like any library calls.
Application and limitations, what this could be used for?
Connecting and controlling Arduino from PC or raspberry comes first to mind. The same IOCOM library can be run at both ends. In this context IOCOM provides fast communication for IO state style data with named signals and name based versioning. Or Arduino could be integrated as IO/control unit in larger system.
Arduino UNO is not powerful enough to run Ethernet or WiFi, use of IOCOM is limited to serial communication. Even this hits close to boundaries of the UNO’s resources. Requirements of networking, TLS and secure communications are far above capability of this board.
Using iSpy to test testing code in linux
It is good idea to test that all runs in linux PC before trying anything on real hardware.
Create pair of imaginary serial ports connected to each others, see Testing serial communication with socat. for me these ports are /dev/ttyS30 (uno) and /dev/ttyS31 (iSpy). We practically always use 115200 bps, 8 bits, no parity, 1 stop bit, no handshake. If nothing is mentioned assume that this is the case.
notes:
Setting permissions for socat ports is important, and ports may not appear as 2 and 3 in /dev/pts, for me these were now 3 and 4.
Setup iSpy to listen serial communication from /dev/ttyS31

notes:
You may need to build iocompython in /coderoot/iocom/extensions/iocompython.
iSpy can be started “cd /coderoot/iocom/extensions/iocompython/examples/ispy” and “./ispy.sh”.
Start “uno” in linux PC
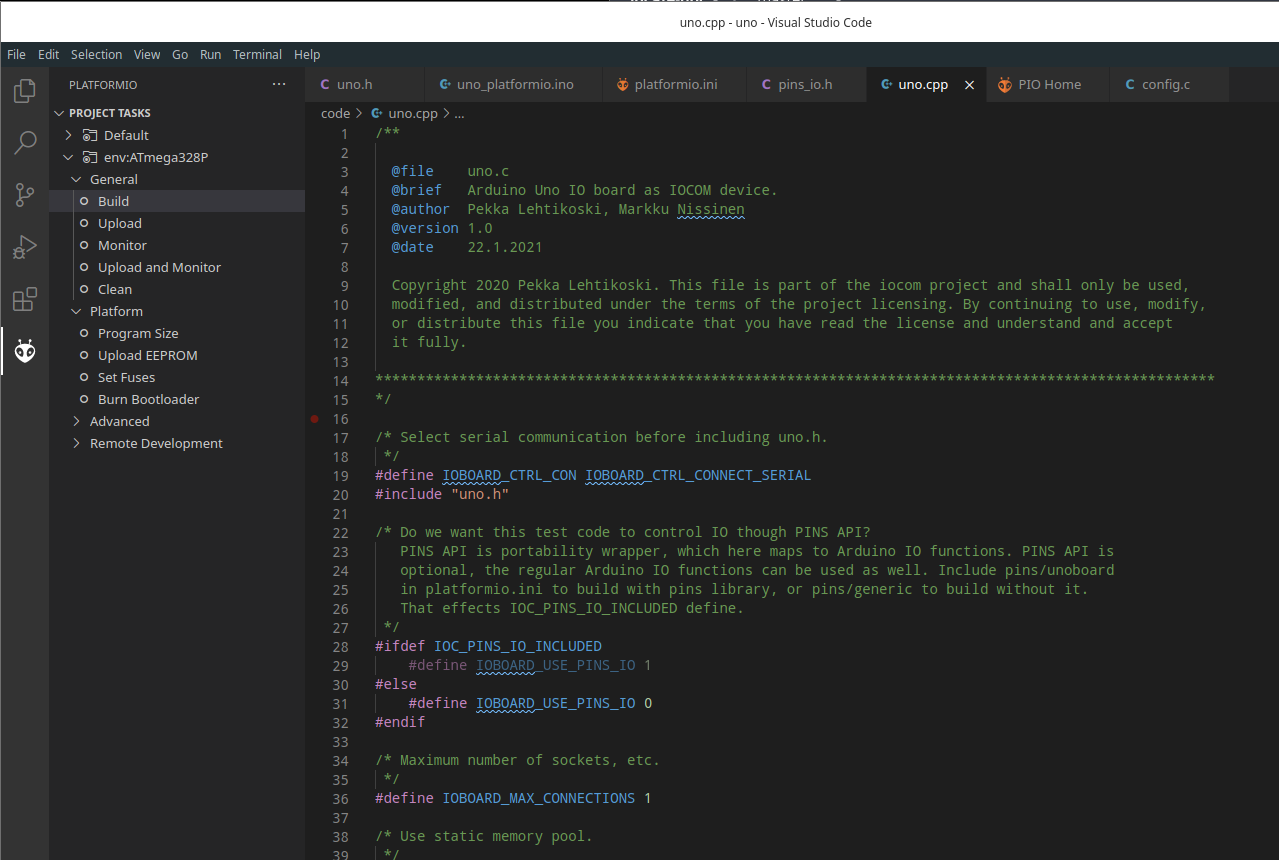
Open uno in your C development environment in /coderoot/iocom/examples/uno. Make sure that serial port is “ttyS30”, etc in uno.c.
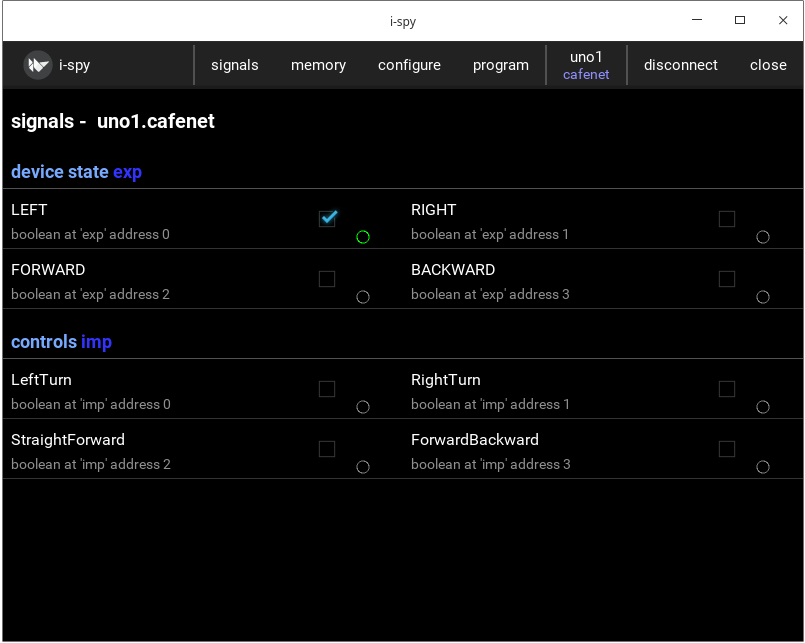
I see it working:
Test “uno” in real Arduino UNO board
I use PlatformIO to build and upload “uno” application to real hardware. It starts immediately when downloaded. The UNO board has only one serial port: No change of mistake, so setting in uno.c is ignored. Then I started iSpy as server to listen to serial port connected trough USB cable. This port must be set in iSpy. iSpy view is exactly the same as in linux PC simulation. I was happy about speed, even UNO is 8 bit processor, communication latency seems to be in order of a few milliseconds.
Install Platform IO for Visual Studio Code, and open folder /coderoot/iocom/examples/uno in the IDE:
notes:
Arduino board is seen in linux as “/dev/ttyUSB0”, “/dev/ttyACM0”, “/dev/ttyACM1”, etc. Use “ls /dev/ttyUSB*” and “ls /dev/ttyA*” to figure out which one. You may remove/plug the USB cable to see which device name appears/disappears. If you are running linux in virtual machine, connect USB port to it and not to host.
PlatformIO uses same serial port to upload software. Close the Microsoft Visual Studio Code before starting iSpy to make sure serial port is not used. And Vice versa, close iSpy before trying to upload a program.
If you run out of RAM (stack overflow may happen somewhere around 85% RAM use and UNO crashes), the settings -D SERIAL_RX_BUFFER_SIZE=256 in platformio.ini can be changed to 128. This is below IOCOM spec, but seems to work in practise.
Pins library can be linked with the code and may work, but testing with Arduino UNO is not done (22.1.2021).
Upload this test example to Arduino UNO
The prebuild example code can be loaded to Arduino UNO without installing tools. First make sure that avrdude is installed (in path) and change to directory containing the hext file
sudo apt install avrdude
cd /coderoot/iocom/examples/uno/firmware
Upload the hex file. You need propably to replace /dev/ttyACM0 with your serial port device. Could be /dev/ttyUSB0, etc.
avrdude -patmega328p -carduino -P/dev/ttyACM0 -D -Uflash:w:210124-uno-firmware.hex:i
You may need to specify upload baud rate:
avrdude -patmega328p -carduino -P/dev/ttyACM0 -b57600 -D -Uflash:w:210124-uno-firmware.hex:i
notes 23.1.2021/pekka